")
A slow laptop can turn even the simplest task into a frustrating experience. Applications take longer to open, the system freezes unexpectedly, and multitasking becomes nearly impossible. When running on Windows 11, performance issues usually stem from a combination of startup overload, outdated drivers, background processes, insufficient storage, or hardware limitations. The good news is that most slowdowns can be resolved without replacing the device.
This comprehensive step-by-step guide explains how to diagnose and fix performance problems in a structured, professional manner. Each step builds logically on the previous one so that improvements are measurable and sustainable.
Step 1: Restart and Perform a Basic Health Check
Before diving into advanced fixes, begin with a proper system restart. Many users rely on sleep mode, but restarting clears temporary memory (RAM), resets background services, and resolves minor glitches.
After restarting, observe:
- Does the system boot slowly?
- Is the delay happening when opening specific apps?
- Does performance drop during multitasking?
Open Task Manager to check system usage.
To open it:
- Press Ctrl + Shift + Esc
- Or right-click the taskbar and select Task Manager
In Task Manager, monitor:
- CPU usage
- Memory usage
- Disk activity
- Startup impact
If CPU or Disk stays above 90% for extended periods, the issue is likely software-related rather than hardware failure.
Step 2: Disable Unnecessary Startup Programs
One of the most common causes of a slow Windows 11 laptop is too many startup programs launching automatically.
Inside Task Manager:
- Go to the Startup Apps tab
- Check the “Startup Impact” column
- Disable high-impact apps that are not essential
Common examples that can safely be disabled:
- Auto-launching messaging apps
- Game launchers
- Updater services
- Cloud sync tools (if not urgently required)
Reducing startup load significantly improves boot speed and responsiveness immediately after login.
Step 3: Free Up Storage Space
Low disk space directly impacts system performance, especially if the laptop uses a traditional HDD instead of an SSD.
Open the Settings app:
- Go to System → Storage
- Enable Storage Sense
Storage Sense automatically removes temporary files, system cache, and recycle bin contents.
Additionally:
- Uninstall unused applications
- Delete large video files not needed
- Clear Downloads folder
If using a mechanical hard drive and free space drops below 20%, performance degradation becomes noticeable.
Step 4: Run Disk Cleanup and Optimize Drives
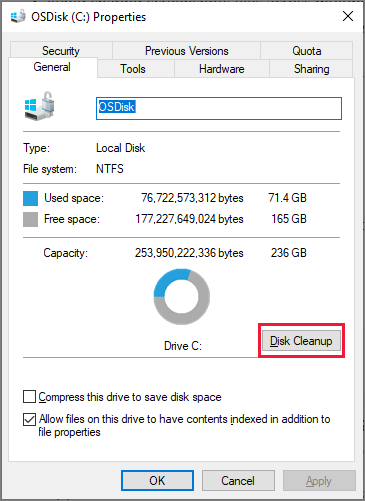
Search for Disk Cleanup in Windows search and run it. The Disk Cleanup tool removes:
- Temporary files
- System cache
- Windows update leftovers
- Thumbnails
After cleanup, search for “Defragment and Optimize Drives.”
If using HDD:
- Click Optimize to defragment the drive
If using SSD:
- The system automatically performs TRIM optimization; manual defrag is not required
Drive optimization can restore lost responsiveness, especially on older laptops.
Step 5: Check for Malware or Security Threats
Malware often runs silently in the background, consuming CPU and disk resources.
Open Windows Security:
- Go to Virus & Threat Protection
- Run a Full Scan
A full scan may take time but ensures no hidden processes are affecting performance.
Avoid installing multiple antivirus programs simultaneously, as they conflict and slow the system further.
Step 6: Update Windows and Drivers
Outdated drivers or incomplete updates frequently cause slow performance.
Go to:
Settings → Windows Update → Check for Updates
Install all pending updates.
Also update:
- Graphics drivers
- Chipset drivers
- Network drivers
For laptops with Intel processors, visit Intel’s driver support assistant.
For AMD systems, use AMD support tools.
Updated drivers improve power management, hardware compatibility, and efficiency.
Step 7: Adjust Visual Effects for Performance
Windows 11 includes animations and transparency effects that look modern but consume system resources.
To adjust:
- Search “View Advanced System Settings”
- Click Performance → Settings
- Select “Adjust for best performance”
This disables animations and visual enhancements.
On low-RAM systems (4GB–8GB), this step can noticeably improve responsiveness.
Step 8: Manage Background Apps
Many apps continue running even when not actively used.
Go to:
Settings → Apps → Installed Apps
Review apps that:
- Run background services
- Sync data continuously
- Auto-update
Disable unnecessary background permissions.
If using OneDrive, pause syncing during heavy tasks like video editing or gaming.
Step 9: Increase Virtual Memory
Virtual memory (paging file) allows the system to use disk space as temporary RAM.
Steps:
- Open Advanced System Settings
- Go to Performance → Advanced → Virtual Memory
- Set custom size (1.5x to 2x RAM recommended)
Example:
- 8GB RAM → Set 12GB–16GB virtual memory
This improves stability during multitasking but should not replace physical RAM upgrades.
Step 10: Upgrade Hardware (If Necessary)
If software fixes do not resolve the issue, hardware limitations may be the root cause.
Recommended upgrades:
- Replace HDD with SSD
- Upgrade RAM from 4GB to 8GB or 16GB
- Clean internal dust buildup
Switching from HDD to SSD often reduces boot time from 2 minutes to under 20 seconds.
Performance Improvement Comparison Table
Before vs After Optimization
| Issue | Before Optimization | After Optimization |
|---|---|---|
| Boot Time | 90–180 seconds | 15–30 seconds (SSD) |
| CPU Usage Idle | 60–90% | 5–20% |
| App Launch Speed | 10–20 seconds | 1–5 seconds |
| Multitasking | Frequent freezing | Smooth transitions |
| Disk Usage | Constant 100% | Stable below 30% |
This table demonstrates how systematic optimization leads to measurable performance gains.
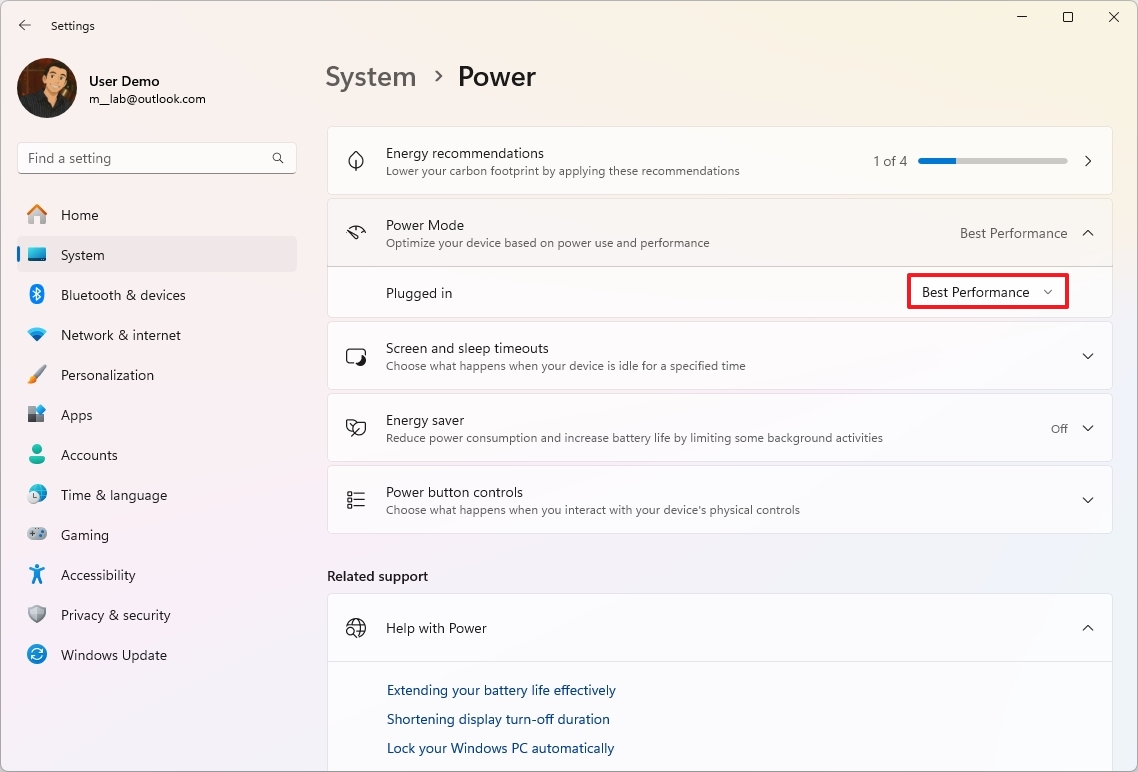
Step 11: Check Power Settings
Windows may be running in power-saving mode.
Go to:
Settings → System → Power & Battery
Switch to:
- Best Performance
Balanced mode limits CPU frequency, especially on laptops.
Step 12: Reset Windows (Last Resort)
If all steps fail, resetting Windows can restore performance.
Go to:
Settings → System → Recovery → Reset this PC
Choose:
- Keep my files (recommended)
This removes problematic apps and restores system configuration without deleting personal data.
Resetting is often effective when corruption or registry conflicts slow down the system.
Additional Advanced Checks
1. BIOS Update
Sometimes outdated firmware limits performance. Check laptop manufacturer support pages for BIOS updates.
2. Thermal Throttling
Overheating forces the CPU to reduce speed. Clean vents and ensure proper airflow.
3. Background Services Audit
Use Task Manager → Services tab to inspect unnecessary services.
Frequently Asked Questions (FAQ)
Why is my Windows 11 laptop slow even after updates?
Updates alone do not remove startup overload, malware, storage clutter, or hardware limitations. Performance requires a holistic approach combining cleanup, optimization, and sometimes hardware upgrades.
Does upgrading RAM really improve performance?
Yes, especially when upgrading from 4GB to 8GB or more. RAM allows smoother multitasking and reduces reliance on virtual memory.
Is Windows 11 slower than Windows 10?
Not inherently. On supported hardware, Windows 11 performs similarly or better. Performance issues usually stem from configuration or outdated drivers.
How much free space should be available?
At least 20–25% free disk space is recommended for optimal system performance.
Should animations be disabled permanently?
On low-end devices, yes. On high-performance systems, visual effects typically do not cause noticeable slowdowns.
Does factory reset fix slow laptops permanently?
It removes software-related issues but does not improve hardware limitations such as low RAM or slow HDD drives.
Long-Term Maintenance Checklist
To keep Windows 11 fast:
- Restart weekly
- Keep at least 20% disk space free
- Disable unnecessary startup apps
- Run antivirus scans monthly
- Install driver updates regularly
- Consider SSD upgrades for older laptops
Consistency prevents future slowdowns.
Final Thoughts: Building a Fast and Stable Windows 11 Experience
A slow laptop rarely has a single cause. Instead, it reflects accumulated startup programs, outdated drivers, background services, storage clutter, and sometimes aging hardware. Addressing performance issues step by step ensures lasting results rather than temporary fixes.
Windows 11 is optimized for modern hardware, but even older laptops can perform efficiently when configured properly. Startup optimization improves boot speed, storage cleanup reduces disk bottlenecks, malware scans eliminate hidden resource drain, and visual adjustments enhance responsiveness. When necessary, hardware upgrades such as SSD installation provide transformative improvements.
By following this structured approach, users can restore speed, extend device lifespan, and maintain stable performance for years. Instead of replacing a slow laptop prematurely, strategic optimization often delivers results comparable to buying a new device.
A well-maintained system is not just faster—it is more reliable, secure, and productive.